Some HOW, Some WAY this tiny newborn of mine turned a full year old. I’m just over here trying to wrap my head around the fact that I’ve known this sweet boy {on the outside} for 365 days. It’s pretty unbelievable- in the fact that I can’t believe how fast it went, but also in the fact that I can hardly remember life without him.
Anyways, all sentimental mommy emotions aside…here is what we did to celebrate our little MAX!
We went with the “Wild ONE” theme because, first of all his name is MAX and this costume from last Halloween kind of set the whole thing in motion. And secondly- because this kid is pretty much the definition of WILD!
We decided against a big party this year and just celebrated low-key with family. Of course I went over-the-top with decorations, but that’s just to be expected… 😉
Max’s birthday started the same way we start all the kids’ birthdays since Q was born: their “Annual Birthday Balloon Wake-up”! We all piled into the Birthday Boy’s room with a ton of balloons and sang him “Happy Birthday!”
He hated it.
No literally, he cried.
It’s always been a tradition to decorate the mantle for holidays & birthdays. So, of course, Max’s birthday was no exception! I’ll link that cute green “ride-on” bike below with everything else!
We had a normal day and then had all of our family members come over for a casual dinner that night. We ate, drank, open presents, and had cake– simple…like in the olden days. (But with a dining room decorated like the jungle, and goodie bags for the girls, and a million balloons. Ok. So- NOT simple. But, simpler than a big old party!) 😉
One fun idea I (and by “I”, I mean Pinterest) had was for everyone to write a little note to Max in a copy of “Where the Wild Things Are”. I’ll save it along with the birthday cards he received from anyone who couldn’t be here.
I decided last minute to give the girls tiny goodie bags. I filled them with fun trinkets like stickers, slime bath bomb (to use in the OUTDOOR water table- NOT in our bathtub), some surprise packs, and a few treats.) I figured it would make the “boring grown up dinner” a little more festive for them….AND keep them occupied for a bit, so that us “boring grown ups” could talk!
Another great idea that just kind of fell into place was the idea of this mini “photo booth”. I still had the piano room set up from Max’s cake smash shoot, so I just took out the high chair, replaced it with a bench and had my family take turns taking pictures there with Max. Turned into a cute idea! I think I’ll print the pics and put them in his “Wild Things” memento book!
(Sidebar: For the animal party hats. I bought plain party hats and the animal ear headbands separately. I then just glued the animal ears to the party hats!! 🙂 )
In lieu of a party, (and also because I like to celebrate my kids’ birthdays for more than one day) we spent the next day at the zoo together. We had so much fun!
And we can’t forget Max’s “cake smash”! I had this sweet little “Wild Thing” cake made by a local bakery called Fancy Cakes by Lauren and it was perfect…and delicious! (See ya, later snobby old Society Bakery! See HERE for why!) 😉
Honestly, despite the smiles- Max HATED the cake smash. He was angry when his fingers got dirty and he didn’t get even a little bit happy until we gave him a spoon. He “tasted” the frosting once or twice but mostly just enjoyed hammering the cake with the spoon.
And just because before and afters are fun….
Good work, Bud!
And then lastly, I took his final #ayeartotheMax picture. I delayed for a few days because I was NOT ready for these monthly pictures to be over. They were so fun to do and I KNEW how quickly it would all fly by. I may or may not have cried when I took this last one.
Fastest year of my LIFE!!!
But, also…the very BEST year with my little family of five!!!
Happy {WILD} O-N-E, sweet Max-a-roo!! We love you, Moose Man!
Links
“One Wild Year”, “Wild One” and Animal Print Pendant Banners are all from my favorite, FAVORITE go-to spot for all my party banner & felt ball garland needs –Pearl & Jane!!
The decision to give Q’s room “a little facelift” started with my ridiculous desire to wallpaper every room in the house. Add in recent discussions we were having about switching out her queen bed for two twins and the decision to redo the ENTIRE room was basically made FOR us.
Me.
It was definitely all my fault idea.
Once I knew I wanted to do twin beds I started wrestling with the idea of which wall to wallpaper, the “window wall” where her queen bed originally sat, OR the big empty wall to the right. I “polled the audience” 😉 and you guys helped me decided to not only wallpaper the big empty wall but also to move the bed/s to that all. I was hesitant at first but I have to say- I love how the room flows now. It actually feels bigger and now Q & A can have their weekly sleepovers in Q’s room without complaining about who picked their nose and who-kicked-who in bed!
Ok I’ll stop talking now because I know ya’ll just want to see the pictures. BUT, if you’re interested in a “before” picture to compare what we’ve done and changed, here is the link to Q’s Orginal Room.
Here it is, Q’s “Big Girl” Room Reveal:
Notice how many baskets I’ve worked into the room? This allows Q to have (hidden) places to put all of her “stuff” (i.e. books, her prayer rock, mp3 player, giant yellow emoji pillow that doesn’t match the room, baby dolls, stuffed animals, pokemon cards, etc.) I think it’s important for kiddos to have places to store items they love- it also. makes clean-up/hiding things much easier & helps keep the room looking put together.
I tried to take Quin & her interests into consideration as much as possible when picking out decorations. You can find traces of her love of mermaids, her shell collections, her love of dance, music, and reading, and her dream of one day going to Paris scattered around the room. Look closely…I tried to pick items that hold meaning to Q instead of just things I thought were “pretty”. Even something as simple as putting reading sconces over the beds have made her little book-loving heart SO happy!Who spotted the monitor camera hidden behind the golden elephant?! Yes, I still spy. Lots of people thought that door next to the bed was the door to the hallway, but it is actually Q’s bathroom & closet. I wouldn’t have put the beds on that wall if they were up against the main entrance like that. This record player has been one of my favorite purchases for her “big girl room”. Q listens to stories and music before bed and on “sleepover nights” Q & A put on records and dance and act them out (everything is a “show” with these two!) Plus, collecting old vintage records has been SO. MUCH. FUN! Think The Greatest Showman soundtrack will come out on vinyl?!! (Update: it HAS, and I already ordered it!!!) 😉I kept certain items from her “baby” room because she’s still only six- even if her room is a little more sophisticated now. Her little pink dollhouse and baskets of stuffed animals remind me that she’s still my baby. I know one day they’ll be replaced with “bigger girl” items. But not today! 😉 This Petal Lane “being yourself” quote is actually a magnet board! I think it will be fun for Q to tack pictures to it as she gets older. And that DREAM sign stayed from her old room (it actually lights up and serves as a night light) and I just repainted the frame around it to pop against the newly white walls. (They used to be grey).This gorgeous fiber art rainbow was the pièce de résistance for the room. It’s my a favorite thing EVER and I now need one for every room in the house! And how pretty is that gold foil Eiffel Tower print? (I love breaking up a book shelf with a pretty piece of framed art!) You should’ve seen Q’s face when she saw this. It’s her “dream” to go see the Eiffel Tower one day! Both items are linked, along with everything else, below.Here’s a little TIP for decorating book shelves: If the highest shelf is out of reach for your kiddos try finding books with pretty covers and then ONLY putting the book covers on display on the highest shelf. Tell your kiddos what you’ve done so they don’t go reaching for them. Here’s why I do this: 1.Kids won’t get hurt trying reach for out-of-reach books (aka no heavy books will come crashing down on their heads) and 2. You can put the actual books in a bin somewhere at their level so they can still enjoy the books without them just being “decorations” up high on a shelf, collecting dust.
Hope you liked her little room tour! Links and a collage for pinning are below!
Ready for the cutest little bunny-filled craft idea EVER? Read the steps below for a simple “sponge cake” recipe for your little one’s next tea party! (bunnies optional)
Step One: gather your supplies. You will need:
sponges of all different shapes, colors and sizes (you can always buy a big one and cut it into different shapes!)
scissors
craft glue (I prefer hot glue gun)
paint
kitchen supplies to use as paint brushes (cake scrapers, mini spatulas, tiny butter knives make your little crafter really feel like a chef!)
trimmings: think cute pom-pom ribbon, red poms for cherries, glitter that resembles sprinkles, rosettes, etc.
plastic to-go boxes for your guests to carry home their goodies!
optional: Anything to help set a festive mood. Think tea set, doilies, flowers, and don’t forget some REAL edibles! 😉
Step Two: Invite some of your best buddies over for a “crafty tea party”. Then, allow your crafters to get, well…crafty! Guide them if need be. I had a few “sponge cakes” pre-made for inspiration. Tell them to pretend they are making real cakes for a real fancy tea party! Show them how they can glue sponges on top of each other to create “layered” cakes, how to make roll-ups, etc.
Step Three: While the glue and paint is drying, serve some real snacks. We went with cupcakes, macarons, and “pink lemonade tea”. We also had little bunny visitors for the girls to play with.
Step Four: wrap the girl’s sponge cakes up in a plastic to-go box and send them on their way! Q keeps her sponge cakes with her fake kitchen food and to this day they are some of her & Ardyn’s favorite play food items!
Ok guys, you’ve been SO patient with me while I edited the 24,000,000 pictures I took at Ardyn’s 4th “Ballet” Birthday Party (…and I may have gotten a little lazy on the last 1,000,000 photos) BUT-they’re done. So without further ado, here are the deets and links!
And if you love what you see, help a girl out and go right ahead and pin that little bad boy down alllllllll the way down at the bottom! 😉
For starters I had NO idea what kind of party to throw Ardyn this year. Usually we are in California over her birthday and we skip “a party” and celebrate by doing something fun with her cousins. But this year, she actually asked for a party with her friends, for the first time. And although this may seem a bit extravagant for a four year old’s birthday, let me just say that this is actually the first real birthday party she’s ever had. (We celebrated her first birthday with a few close family friends at a play center- but I’m counting THIS as her first “real birthday party”! )
Anyways, I was calling around to local dance centers because I wanted to switch the girls’ dance studio where they take ballet. I found this local one and knew how gorgeous and bright the rooms were- so, before I hung up with the receptionist I asked if they ever host birthday parties. She said no…BUT that the studios were available to rent hourly. So…the planning began! Tip: Always ask if a place you love “rents out their space”. Just because they don’t officially “host” parties doesn’t mean you can’t make it work!
The lady told me I could hire an instructor to help run the party and we basically went from there! Our instructor ran an hour long dance class for the girls and then we followed with 30 minutes for lunch & cake! The timing was perfect & the girls were occupied the entire time! I included links to all the vendors below as well as some party planning and decor tips!
We had these gorgeous tutus from Trevi Ave Co. available for girls to put on for the party and then take home as favors! They were a hit. AND Trevi Ave Co. is offering YOU GUYS an exclusive discount: 10% off orders $26.99+, ends 4/1/18. Use code: JORDANANDCO! My girls wear these around the house for dress up and to dance class all the time! They are so adorable!
The incredibly gorgeous “Let’s Twirl” banner (along with all the food cards & wand tags) were done by the talented Alexandra over at Lady Bird Paper Co. Seriously, go click on that link…her work is amazing!!!
The leaf garland was an old find in the Target dollar section last year. The cute little rack was an Amazon find! I loved that it had two heights. I put it on the lower one so that it was right at the kiddos level!
To put the main cake table together, I contacted my girl Amy from Pearl and Jane. She is my GO-TO for all garlands and all things pretty. I gave her my theme and a few inspiration pics and she put together the most gorgeous package of goodies! The pink tutu puff garland, the “Tutu cute” banner, the gold star garland, and the “Tiny Dancer” chair garland were all by Pearl & Jane!. She is SO incredibly talented and you might recognize her work from all of my monthly “Book Nook” posts!
The adorable wands pictured above were by a new little shop I discovered browsing Etsy one day. It’s called Spartan54 and they were so great to work with! I loved how these little wands came out and the girls were SO excited to take one home with their Trevi Ave Co tutus! AND, more good news…Spartan54 is offering you guys 15% off your order of $40.00 or more!! Use code: JORDANANDCO15
The perfectly dainty food name cards, and the wand favor tags, again, were by the talented Lady Bird Paper Co!
The tables and chairs I unfortunately had to rent. I got them from Big D Party Rentals. They were great but got stuck in traffic and arrived with all of my tables, chairs and table clothes (that needed to be decorated) TEN minutes before the party started! Thank GOD I had my whole family there to help set up!
The cake was custom from Society Bakery. HOWEVER, I’m not linking them, nor am I recommending them…I need a new cake shop. Anyone local got one for me?! The customer service was awful, the cake was not cheap, and the frosting literally started falling off the cake halfway through the party. We had to rush the girls to sing “Happy Birthday” before the cake was completely ruined. It was the craziest thing…just as if the frosting was full-on melting off of the cake. I’ve never seen anything like it- and the room was NOT hot!!!
The GORGEOUS fondant ballet slippers I ordered from Wonder Cake Deco and they literally MADE the cake!!! Society Bakery doesn’t do fondant either…another reason I need to go elsewhere!
The signed ballet slipper was from our first trip to see the Nutcracker, we bought this slipper worn & signed by the Sugar Plum Fairy. It’s one of the girls most prized possessions!Q’s outfit: Trevi Ave Co & Cute Bird Accessories Bow!
These wands from Spartan54 were totally a hit!! The tag from Lady Bird Paper Co says “you are tutu sweet for coming!”
Food Ideas:
(we did a play on words with some ballet terms)
“demi” donuts: white powdered donuts
“ballet school of fish” : pink goldfish
“pink puffs”: cotton candy on ice cream cones
“tutti frutti”: fruit platter
“tea sandwiches”: mini sandwiches from Corner Bakery
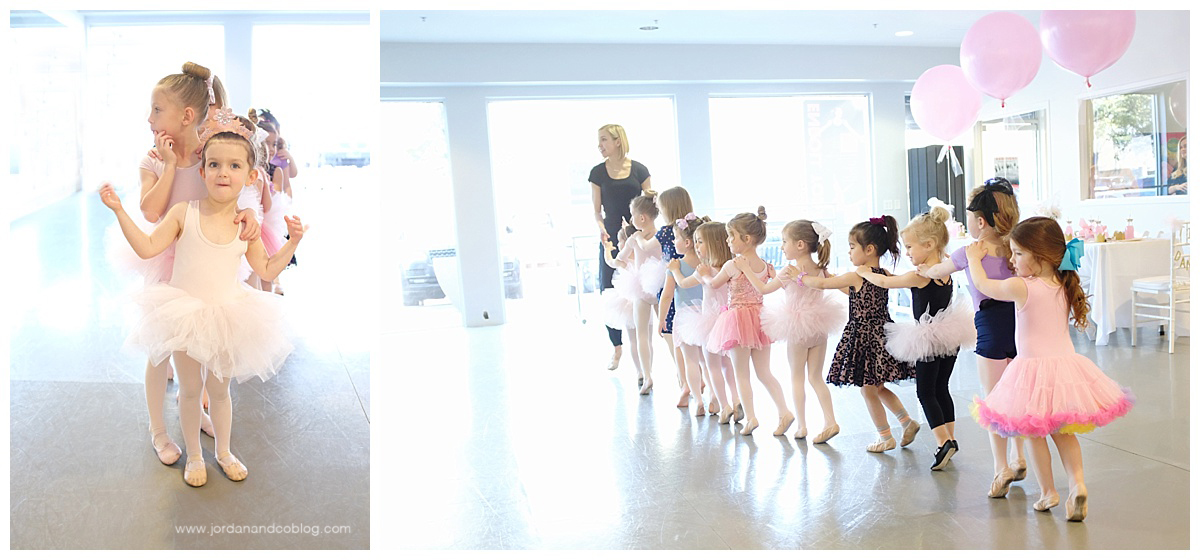
Do you not die over the little girlies picking out their tutus?! I cannot!
A few fun images from the dance class. Our instructor was incredible!
And then it was time for lunch & cake!
(Bonus points if you can spot the “melting cake” in the pictures!!)
And then I took a million pictures with these gorgeous balloons (that were too big to come home with us) before we left. Balloons Everyday really does a superb job! We use them for all our parties! As we were leaving the girls asked if they could send one up to PopPop since he couldn’t be there to celebrate. Gah- that gets me everytime.
And there you have it! I think it’s safe to say that Cub enjoyed herself…seeing as how she fell asleep about 0.05 seconds after hitting the car!
I hope you found this party guide helpful! I know a lot of you mentioned that you were also throwing Ballerina parties and wanted all the links and inspiration you could get. Honestly, I worked with some of the most incredible vendors and I HIGHLY recommend all of them for any of your party needs…ballerina or otherwise!
When I was in college I was a nanny for the most amazing family. I’ll never forget, one morning, when I was bringing the boys to school, I saw another mom dropping off her daughter. I saw her a lot. But on this morning, something just struck a chord with me. She was in…well, let’s be nice and call it “activewear”, but I’m pretty sure it was just full-on pajamas. Her hair was a mess, no makeup on, coffee in hand. She had obviously walked from her house to the school for drop off, and had her youngest babe in a wagon, wearing footie pjs, eating puffs out of a little cup. And this mom, she was so dang HAPPY- hugging her biggest babe, telling her to have a great day, and smiling at her littlest babe in the wagon- just loving life. I remember I went home that day and told my best friend/roommate about it. I said, “I just want that. I can’t wait for that.” I must’ve been maaaybe 20 years old.
Fast forward waaaaaay too many years, a marriage to the same guy I was dating at the time I saw that sweet hot mess of a mom, a move across the country, years of struggling with infertility, new houses, new friends, and then, finally…babies. Three babies! It’s been six years since I became a mommy. SIX years of love and pure bliss, but also exhaustion and work and mayhem and just- life. The days fly by and most days I’m struggling to get it all done. And although sometimes, through the joys of social media, it LOOKS like I get it all done, like I have my shit together- really, I don’t.
I try- but I don’t.
If I’m throwing Cubby an elaborate birthday celebration, you don’t the see the shambles that my house is in: boxes and helium tanks and tissue paper and hot glue guns still sitting on the counter from crafting party favors. When we take an amazing trip you don’t see the piles and piles and (ok- mountains!) of laundry that sit and sit- sometimes for weeks, waiting to get done. When it looks like I’ve got this “mom thing” down pat, you don’t see the notebooks full of lists of all the collaborations and projects and posts and photos and emails that all need to get written and edited and answered. It’s a lot- as I’m sure you ALL know; a juggling act 100%- this motherhood thing. And sometimes we can get lost in that mountain of laundry, in that enormous looming to-do list. We get buried and can feel like we are just in “survival mode” each and every day- with the end goal being to just get through another day. To get ALLTHETHINGS done.
But today, I got Ardyn all dressed for school in the new sparkle unicorn headband a friend gave her for her birthday that she just HAD to wear, I grabbed her school tote, her coat, my coffee, and Max and headed out the door. I could hear Ardyn singing as she was getting herself buckled in the car and I started singing along with her. She rudely told me to stop because I was ruining the song and I started laughing so hard. That girl freaking cracks me up! And then I caught a glimpse of myself in the reflection of the window. A messy nest of hair that hasn’t been washed in days, no makeup, my pajama top paired with yoga pants, coffee in one hand, my baby in the other, his chubby dimpled hand gripping my arm, and a huge smile on my face. And all I could see was her. That mom. And it hit me-I am her. I’m the happy hot mess of a mom that I wanted SO desperately to be all those years ago.
And I’ve rambled for so long and I’m just now realizing that I don’t really have a point…. so I’ll just end by saying this:
Sometimes, we just need a reminder- a reminder that there was a time when all we ever wanted was what we currently have. Today I got that reminder. Screw the laundry and the lists. There will be a day when the house will be quiet, when I’ll have all the time in the world for those things, when my house will be impeccable with not one Peppa Pig figurine on the floor…and life will be filled with other, different exciting things. But today is not that day. And I’m insanely happy about that.
So, let me start off by saying- I’m not an etiquette expert (…by any means!) but I do bring hostess gifts to parties and I am a stickler for a hand-written thank you cards. In a world where EVERYTHING is done and accomplished through a screen and a keyboard, I’m a firm believe that a good old-fashioned hand-written thank you card will NEVER go out of style!
I mentioned on my Instagram stories the other day that I always keep thank you cards and stationary on hand at the house. You never know when you may need to send a little “thanks” to someone. Listen, I know what you’re going to say- you can always drive to Target and pick some generic thank you cards up in a pinch, BUT there is something so nice about receiving a note on pretty personalized stationary, don’t you think?
Here are a few of my favorite picks for Thank You cards in kids, baby, women’s, men’s and family categories:
KIDS THANK YOU CARDS
I want my kids to learn the art of sending a thank you note, however- when my children are just learning to write, I like to keep it as simple (and tear free) as possible. Of course, I write thank you cards for my children until they are old enough to write themselves, but even in Ardyn’s case- even though she can’t write yet, I still make her “sign” her own name on the card. That being said, for younger children, I think the “fill-in” cards are adorable. I love the ones that also allow the child to color them in. I think it adds so much personality and really shows that an extra effort was made.
Here’s my general rule for baby cards (and this is totally just a “me” thing)…I WANNA SEE A PICTURE OF THAT CUTE BABY’S FACE! Hah! But really, though. I always try to opt for a baby thank you card that has a place for a picture on it. For Max, I used a cute & simple picture from his newborn session, put it on a very simple, personalized thank you card, and I used that card all the way up until, well- last week, when I received a baptism gift from an Aunt. Of course, the trouble with those cards is that you obviously can only use them for about 6months to a year before the child way outgrows the photo. For Q&A, when they outgrow their personalized picture thank you cards, I give them the extras for their art center to play “mail” with. Great letter-writing practice! 😉
Needless to say- simple, beautiful, non-photo thank you cards are always a great option as well!
I’m just a sucker for pretty stationary and I like having cards that are personalized and “thank you” specific, on hand at all times. I only order them once a year (about 20 of them) and I love that when something comes up…ie an Instagram BFF sends me a fun surprise in the mail 😉 I have a card ready to send. Here are a few of my favorites:
So, I don’t have anything for this category mainly because of two things (And I’m just going from personal experience here): 1. Ahem, I’M the one writing alllllll thank you cards for any gifts that come through the house around here and 2. On the rare occasion Ryan needs to send a thank you note of his own- it is usually business-related and he will send it on company letterhead, OR if it’s personal- I still think he’d chose a simple masculine card with his name and or monogram embossed on it. I just can’t see him reaching for any sort of “thank you” card with polka dots and gold foil borders! Haha. I DO get him his own stationary (see below) just not “thank you” specific cards.
FAMILY THANK YOU CARDS
Going on what I said above, I feel like having a family thank you card on hand is a good idea because it covers all bases and yet, still feels personal. I like to keep our family card super simple. Again, I buy about 10-15 of my favorite design once a year and I rarely go through them all. These are great to give to party hosts, to give as thank yous for gifts after Christmas, for family/friends that hosted you on a trip, or for anytime you feel the need to say thank you to someone on behalf of your whole family! Again, simple stationary would do the trick here, but I do like having just a few “thank you” specific cards on hand!
Ok, so now that Thank You cards are out of the way, I also LOVE to have really pretty, really simple letterhead stationary for each member of the family. Not a ton, just a small handful for the rare occasion when a written note is in order. I’m in love with Joy Creative Shop’s stuff. She also makes notebooks (you all know how much I love a notebook!), stickers, meal planners, gift tags, etc. And I just really like how clean, simple, and fun all of her stuff is! You have to go check her out for all of your family’s paper good needs!
EXTRAS
So I keep a few bins of “letter writing essentials” in my office. Here’s what I keep in them:
1. Pretty stamps. I know it’s dumb…like spending money on cute checks…but I can’t help it. A pretty stamp makes the whole package come together, you know what I mean? No? Ok, maybe I’m going a bit overboard here. Anyways, I buy cute stamps on amazon whenever I see ones that I love. THESE fern ones are my favorite!
2. Address stamper, I got one from Ink Me This on Etsy. Love their designs!
3. Cute washi tape to seal my envelopes with. HERE are some cute neutral ones that I love but I also really like supporting small Etsy shops like Pretty Tape (bonus points for her being local…anything to speed up shipping to my impatient online-shopping self!)
I find that writing a note or a thank you card isn’t such a huge ordeal when all of my supplies are in one place!
I also keep an address book file on my computer as well as a print-out in the top drawer of my office desk so that it’s always on hand. I use excel for my address book so that it can be easily uploaded onto sites like Minted or Tiny Prints during Christmas time or any other time I’m sending out a bunch of cards.
The last thing I do sometimes, is I keep THIS Polaroid camera on hand in a bin in my office. Sometimes when I’m writing a fun/personal note or thank you to someone we haven’t seen in a while (or just for fun) I’ll take a quick Polaroid of the kids and slip it in with the card. People really love it…because, let’s be honest, although they’re appropriate and necessary (in my opinion), thank you cards aren’t typically very fun to open. But, whether it’s with some super cute stationary, a prettily addressed envelope, or a fun picture inside, I figure, if I’m sending snail mail…better make it worth the hand cramp! 😉
We got so many messages and questions while we were away after Christmas this year so I figured I’d answer some of them here! Let me know if you have any others and I’ll add them to the post!
image via vailrealty.com
Where were you guys?
Vail, Colorado
We’ve been going skiing for a few years now the week between Christmas and New Years. In the past, we’ve always stayed right in Vail Village, but this year we stayed in the next village over (a 3 minute shuttle ride) called Lionshead. It literally looked like Arendelle from the movie Frozen! It was super cute and a 30 second walk to the mountain from our hotel, BUT we all agreed that Vail Village is much better in terms of walking around, shopping, eating, etc.
Where did you stay?
Austria Haus- Did you click the link? HOW cute is this place? We stayed here our first year. Very small, very cozy. Amazing brunch. Right on the main strip in Vail Village so you can basically walk anywhere. However, it was a little TOO small for me.
Tivoli Lodge– Stayed here last year. This one might be my favorite. It’s small enough to have that cabin-in-the-woods feel but big enough to NOT feel like a bed & breakfast (not my thing). This place has an awesome lobby with a giant fireplace and huge oversized couches and chairs. Hot chocolate and fresh cookies are abundant and it’s just all-around cozy! Also right in the heart of Vail Village.
Arrabelle- This is where we stayed this year. It is in Lionshead and it was by far the fanciest place of the three. It was super beautiful, provided us with a 3 bedroom unit so that my whole extended family could stay together instead of in separate hotel rooms, and the service was impeccable. It also had a restaurant “Tavern on the Square” attached which had a great brunch and an AWESOME rooftop with hot tubs and a heated pool. (Did I mention an awesome spa as well? Definitely took advantage of that!) It was also about a 30 second walk to the gondola from the hotel- so the location was ideal. The ONLY downside to this place, well two actually: 1. You have to take a shuttle or car to Vail Village and 2. Although beautiful, this hotel lacked the “cozy mountain cabin” feel that the other two places had!
image via arrabelle.rockresorts.com
Best places to eat?
In Lionshead:
Blue Moose Pizza– yummy casual pizza right in the square
Garfinkles– They have an awesome outdoor patio on the second story where you can basically watch people ski down the mountain while you eat. They fill up FAST at lunch but I believe you can call ahead and make reservations.
Bart & Yetis– cute little lunch spot.
In Vail:
Bol- This is a bowling alley attached to an amazing restaurant. Caution: you can NOT walk in and bowl. We tried that the first year and they laughed in our faces. We basically make our reservations a year in advance.
Elways– This is a steak house and is always our fanciest meal of the trip. Pricey but worth it for the side dishes alone.
La Bottega– Yummy, tiny little Italian joint. If you are a big party and you call to make reservations ask to NOT sit by the front door. When it’s freezing outside, and the door keeps opening, that seat stinks!!
Campo di Fiori– our #1 FAVORITE italian meal in Vail. Seriously delicious!
Vendettas– a cute little lunch spot- yummy soup. Very popular and fills up quick!
Pepis– known for their bavarian pretzels and sausages (yuk!) Also, here’s a secret tip, you need to call for his schedule, but they have a singer named Andy who performs at night and he is AH-MAZING! Go watch him sing, and tell him “Dallas” sent you! Don’t forget to do a shot-ski while you’re there! Kids can only stay until 8pm, fyi.
The Red Lion– Maybe the most popular lunch spot in the village…? Always packed, get there early if you can to save a table. And then order the nachos, stat.
Pazzos– A yummy pizza place in V V. Also gets CRAZY crowded at dinner with a line out the door, so go early or order to go!
Big Bear Bistro– a teeny tiny little breakfast joint. Super yummy but also can get pretty packed!
Loaded Joe’s– a hidden gem…downstairs little coffee nook!
Joe’s Famous Deli– a yummy downstairs deli where Vince Vaughn is known to eat with his fam! 😉 (saw him there last year)
Mountain Standard– Another place we walked by but have never eaten. Looks pretty awesome! A definite must for next year!
Did both girls ski? How long have they been skiing?
We put Q in private ski lessons when she was three. Then last year we put her in all day every day ski school and found to be much more effective. This year she did one day of a private lesson and then skied with Ryan the rest of the trip. She’s pretty much a pro now and skis circles around me (which isn’t exactly a hard thing to do!)
This was Cubby’s first year and she did ski school almost every day & loved it!
Where did you get the girls coats?
The girl’s pink and maroon winter coats were from J Crew. I linked them HERE. I’d highly suggest getting a pair of mittens on a string. You, know like in the olden days? I linked my favs from EGG, HERE. We strung them through the girl’s coats and never had to worry about them for the rest of the trip. (obviously these are not ski gloves, just casual winter mittens)
What gear do the girls wear in the snow/when skiing?
Ok, here’s my clothing checklist for when they ski:
underlayer/thermal
snow pant jumper
ski coat
fleece fitted infinity neck scarf
helmet
goggles
thermal gloves
ski mittens
thick ski socks
They’ve always been plenty warm in that. Remember they’re moving a lot and working up a sweat under those layers!
The girl’s ski gear was a mix of brands from different ski shops collected over the years. Our fav ski brand for kids are Obermeyer, KJUS, & Patagonia. I’ll link a few options here, but you’ll need to explore for the style/fit/price that best works for your kiddo:
Snow Pants (I prefer the jumper verses just the pant for kiddos)
Snow Mittens (here’s a little tip I learned: most people think gloves keep the hands warmer, but actually mittens do! Having the fingers touching actually promotes more friction and body warmth and keeps the hands warmer! The more you know…)
Where did you get the girls pom hats?
Ok, I hesitate to share these because I can hear the collective eye rolls and judgement…ha! But here goes…the pom hats were from my favorite kid’s boutique in Vail called Skipper and Scout. They are by Mischa Lampert. You can get them a bunch of places, I linked one of the rainbow stripe ones HERE. And before you eye roll, let me be the first to say: yes, they are pricey. VERY pricey. We bought Q one last year and then waited until this year to buy Cub one. But, they are made from some seriously quality materials, and they are so thick and keep the girls super warm. Plus they also fit adults. The girls will have these for years and years so we think of them as investment pieces (plus, I can borrow them ;)! Expensive hats are not for everyone, I understand- but so many people asked where they were from, I had to link them. (I will say, they were cheaper at Skipper & Scout than they are in that link above. So maybe contact them and see if you can order via phone?!)
Whats the best place to get cold weather gear for us moms?
So I get almost all of my winter gear at a local shop in Dallas called St. Bernard Sports. I also got that fun pink pom beanie from Nordstrom this year that I posted in my IG stories. I’ll link a few of my favorite pieces for you! I usually bring cute “walking/shopping/dining clothes” and then my ski clothes.
Hats: They sold out of my hot pink pom beanie at Nordstrom but there are some other color options of the same brand linked HERE. Or HERE is a different brand but another cute shade of pink option!
Ski pants – I love this legging look, and YES they are still super warm! I wear them to “ski” (we all know I can’t ski) AND sometimes out at night in the village! LOVE these by Erin Snow and they are super comfy! Worth the investment.
Base Layer Tops- So many to choose from, but i love this pink one! Go explore for yourself!
Boots: Go for comfort and warmth!! Love THESE and THESE (for a fun furry option!) We had very mild weather this year so I was able to wear my cute pink sperrys a lot! Unfortunately my pink sperrys sold out but I’m loving these gold ones and I actually really really love THESE original colored ones for next year! (UPDATE: I scoured the internet and found my pink duck boots HERE!! Plus, they’re on sale! Hurry up- these will not last!!!)
How do you adjust to the altitude?
OXYGEN! Literally the first thing we do when we arrive is stock up on the oxygen bottles. We use them throughout the entire trip. Also, water, water, water, water. I think we went through three cases of water while we were there. Other than that, we haven’t had much of an issue over the years…even with the little ones. We’ve all been able to acclimate pretty well!
What stroller did you bring?
Ok, so it’s kind of ironic. We bought the Cybex carseat and stroller combo which is so fancy and amazing and we use it ALL the time at home…and yet, we have never brought it with us on one trip!!! When Max was teeny I would carry him in a baby wrap and then as soon as he was sitting we started traveling with an umbrella stroller.
We use the Summer 3D-one Convenience Stroller . I love it because it reclines down, the hood has a huge canopy reach, the basket is a good size for an umbrella stroller, it folds down pretty narrow, has a foot stand so it can stand on its own once folded, is super lightweight, AND the bottom flap of the seat can fold up which basically creates a mini bassinet for smaller babies whose legs don’t reach the edge. We’ve traveled everywhere with this stroller and pretty much love it!
Then, we bring our most favorite travel stroller on the planet: The Pockit. We have two of these but this time we just brought one, figuring both girls wouldn’t need to be riding the whole time and they could take turns in it. This stroller is SO great. It folds down to the size of a purse AND fits in the overhead of the airplane! The only thing is…it’s not the sturdiest- so like, don’t bring it off-roading with you. But for an easy-travel umbrella stroller, its pretty freaking amazing!!! *UPDATE: There is a new version of this stroller with a deeper canopy shade and an option to recline!
Why don’t I bring a double stroller you ask? You know, I just really don’t like them. They’re big & clunky and don’t fold down very small (we were getting in and out of shuttles and cars and in and out of tiny shops and restaurants, up and down elevators, etc. non-stop!). The side-by-side ones feel like you’re pushing a double wide and can’t fit through any doors and the front-to-back ones feel like you’re pushing one of the “extra” suburban Target carts. I’ve tested them all, I just am not a huge fan. Plus, there’s two of us- me and Ryan- and a handful of family members on this trip so we figured two tiny strollers would be much easier to navigate with so many helpers to push. We were right. These two strollers were a breeze to travel with! When Max gets older we’ll drop the Summer and just stick to the Pockits…because there’s a brand new one out that reclines!!!! Splurge for next year, I think! (yep- see above for the updated link!)
Essentials for a Mountain Vacation?
Ok, here is a list of absolute essentials (from my experience) to pack if you are doing a mountain trip with kiddos in the winter time:
HUMIDIFIER- call ahead and ask if your hotel provides them (Arrabelle did!), if not, consider traveling with a travel-size one like THIS awesome one (that works with a water bottle!) OR Amazon priming one to your hotel! You will thank me when everyone starts getting bloody noses and dry throats!
OXYGEN CANS- they sell them in EVERY shop in the villages! Just ask. Get big ones for your hotel room and travel sized ones for your bags!
SUNCREEN- Supergoop is a very serious FAV. This Mineral one is so good and the Acai Fusion SPF30 chapstick is life. I have one in every pocket of every coat. Usually I hate SPF chapsticks because the sunscreen seeps into my lips and feel like I can taste the sunscreen all day. NOT with this one. I use it daily and am obsessed!! Don’t think that just because you are bundled you don’t need suncreen- that snow is a natural reflector and you guys WILL get sunburt. And nobody wants a goggle tan line après ski. 😉
CHAPSTICK- see above! THIS one is my fav! I keep one in every purse & every coat pocket.
LOTION- You will want to bring a nice thick lotion to keep your skin hydrated. Your face and hands, etc. will get super dry!
STATIC GUARD- you will not believe the “weird science” effects the mountain environment will have on your hair!!
SALINE & NOSE BULB- the dry air will dry everyone out and most likely stuff you up too. We used the saline and nose bulb almost daily on Max!
TIGER BALM & EPSOM SALTS- if you are skiing you will be VERY thankful you brought these. I gave myself and the girls epsom salt baths to soothe our sore muscles, and my husband and I used the tiger balm on our shins and calves!
DRY EYE DROPS or MOISTURE DROPS- I get pretty bad dry eye so the mountain environment didn’t help. Just think of it this way- every single part of your body will get dry…bring anything to help yourself maintain hydration! These eye drops were super helpful for me
SUNGLASSES- duh. Feel silly listing this, but I wore my sunnies every single day! That snow reflection is bright!
LIGHT WEIGHT PJS- So you might think, oh winter…let me pack the fleece. Wrong! Most of these resorts have the heat cranked up! We were so dang hot we were opening the windows and doors at night for fresh air. You will want to pack light weight pjs for yourself and the kiddos. If they get chilly, there are always blankets to layer…but you don’t want them overheating in this pjs! I brought my favs: kickeepants and plain jane!
EUCALYPTUS/BREATHE DIFFUSER- Ok, so if you have a travel essential oil diffuser , like THIS one, BRING IT (along with some Breathe or eucalyptus oils to diffuse). If you don’t have a diffuser or don’t feel like traveling with one, grab some balm or a breathe stick that you can apply to chests and feet at night to help with breathing if everyone gets stuffy or short of breath. I love the actual BREATHE vapor stick from DoTerra and I also love this Dr. Bronner’s Menthol Balm.
STROLLER SHIELD- There are so many great ones on the market, but I highly suggest grabbing one. We used THIS one. It really does help when you are walking around at night at it’s freezing and windy!
BALM OR SALVE FOR FACE CHAPPING- Poor Cubby got the most chapped face ever! Even with sunscreen and lotion. So I used plenty of balm on her face. These are my two favs: Mustela Hydra-Stick. Its amazing and glides right on those cheeks like a giant chapstick! Dr. Bronner’s Organic Unscented Magic Balm. It comes in a tin and is basically like magical vasaline. I slathered this stuff all over the kids faces and lips!
What else do you do for fun besides ski?
Well, since I hardly ski, this is an easy question! The “skiers” go out & ski every morning around 8:30. The non-skiers have breakfast, get ready, walk around the village, do some shopping, etc. Then the entire group meets for lunch everyday. We set a time and place beforehand so that everyone knows where to meet since cell service can be spotty. After lunch, some ski again, some don’t. Other fun things we do/did:
shopping
ice skating
games/ movies/puzzles in the house
napping 😉
bowling
dinner
other fun activities that were not open/available this year but are on our list for next year:
“snowcoaster” up on the mountain
sledding/tubing
dog sledding
How do you capture photos while on vacation and what do you do with them?
So, I stopped bringing my big camera on trips a long time ago. I just don’t have space for an extra giant camera bag with our caravan of stuff these days. On this trip I brought my fuji point & shoot….and NEVER unpacked it! I know pictures may tell a different story, but y’all these trips are mayhem! Traveling with 10 people, hopping from place to place, all the clothes and winter accessories and strollers and snacks and bottles- ah! It’s A LOT! I’ve stopped stressing about capturing “the perfect shot” and I use my iphone. I have the X and the camera is pretty freaking awesome. Every photo taken on this trip was taken on my phone!
Then every year I create one epic “IG” book of all the photos I posted that year. (One of the reasons I post so much!) I use Artifact Uprising‘s Instagram book template and I LOVE them!
I think that’s it! If I missed your question or you think of something else, let me know!
This is an oldie but a goodie- posted on my old blog back in February 2016. I thought I’d transfer it over bc it’s one of my favs!
So, I don’t camp. I’m not a camper. I don’t enjoy it, never have.
For one thing- I don’t really enjoy most critters and the thought of them near me while I sleep kick-starts my anxiety and sends it into overdrive. Here’s the thing- I’d be down to find a beautiful spot by some water, throw some pebbles, hike a bit, let the kids splash around barefoot and enjoy nature and whatnot (aka go to a beach). But then I want to go home. And shower. And close my door to the critters and crawl into my bed…where I am fairly certain I’m the only one doing any “crawling”.
Don’t get me wrong- I love seeing pictures and hearing stories of people who are pretty fabulous pro-campers and sometimes I wish I could be those people instead of being my control-freak self. But here’s the thing- I can’t.
I’m getting itchy just thinking about it, so let’s move on.
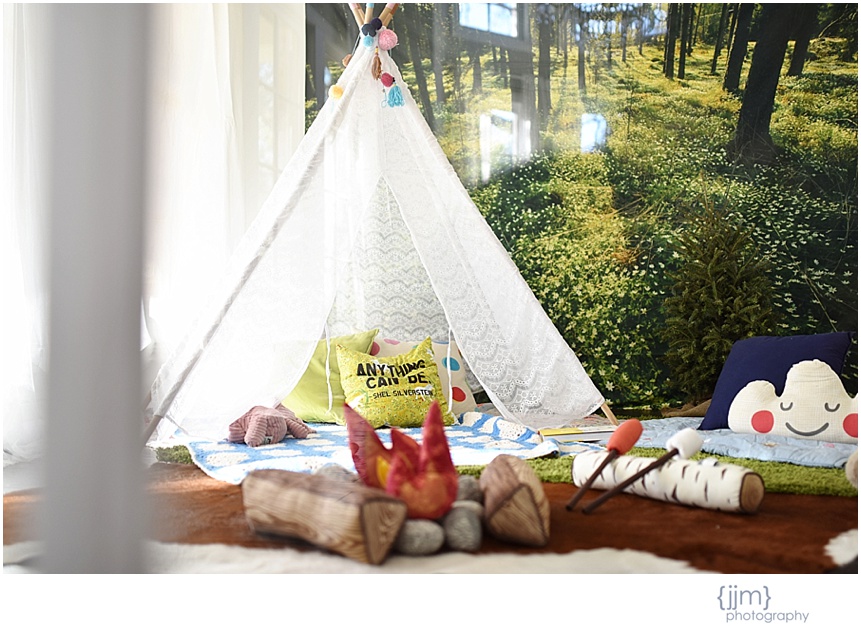
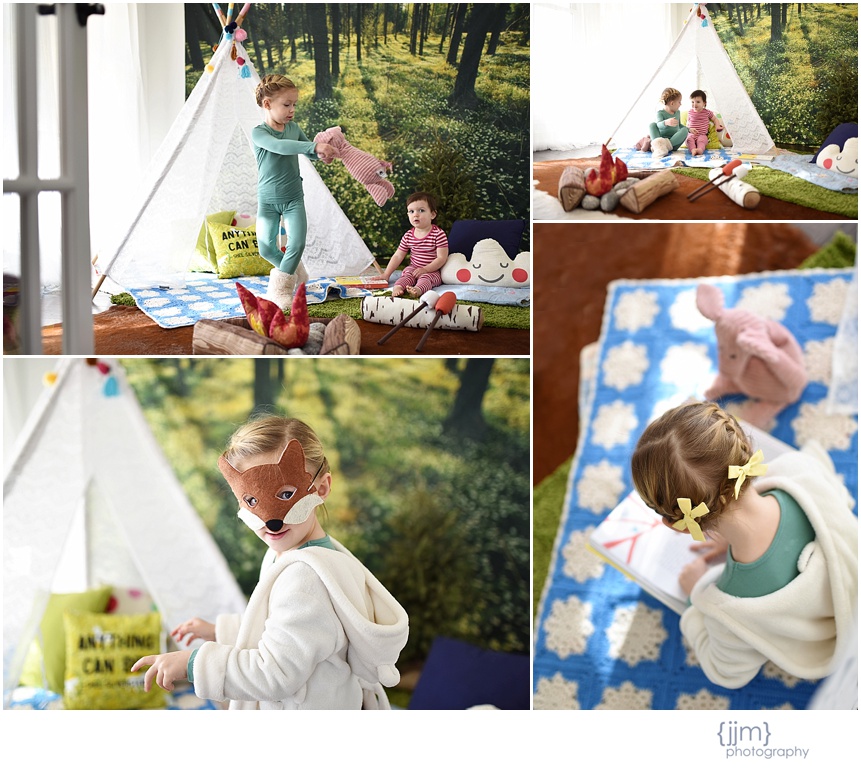
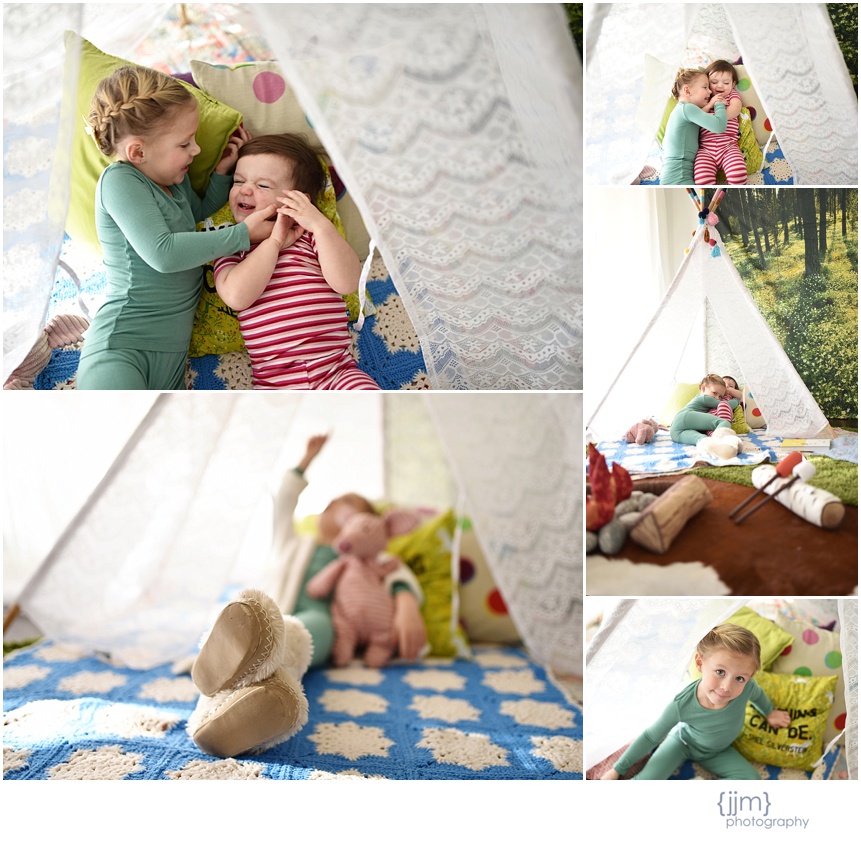
Unfortunately for me, Quinlin has been “ah-sessed” with the idea of camping ever since Princess Sophia the First and her royal troop of Buttercups went off on a camping adventure to collect sparkle rocks and sleep in tents that pop into mini-castles. I wasn’t quite sure how to convince her that this {although it may possibly get even Mommy to go camping} is not reality. So I did the next best thing: I created a little glamp-out, right here in the comfort of my studio.
On Christmas morning the girls came downstairs and just about exploded. We ate real marshmallows (cooked over the fire and then carried in), read stories in the tent, had picnic lunches, and even turned on our star machine and played shadow puppets on the walls at night.
I mean, not to brag or anything, buuut we’ve been glamping on-and-off for about a month now. Yep, a full month. And guess what?
Not one spider was spotted.
Not-a-one.
But now I need my studio back for an upcoming shoot so it’s time for the campground to get rolled up and stored away until another time when we are feeling a little outdoorsy again. 😉
Am I robbing my girls of a classic childhood experience? Probably. But I’m pretty sure they’ll eventually make it out into the great outdoors for a night of real-deal “stories around a smokey fire, curl up in a sleeping bag” type thing. It’ll happen.
You know, when I make their Dad bring them.
So I’ve already purchased costumed for the kids this year, but that didn’t stop me from accepting this “DIY Halloween Challenge”! I love a good challenge…especially when it involves costumes, and this was a great way to get the girl’s involved in some Halloween fun & crafting!
Since the kiddos are doing a theme group costume this year (probably the last year I’ll be able to pull that off, bc…”opinions”) I decided to let them chose their own costumes for this challenge. The only guidelines I gave them was to have it be a character from a book. (I figured since they have “book character” day at school, I could actually use these costumes again. I’m resourceful sometimes.) So, off they ran to the library and started joyously pouring through books amidst cheerful giggles.
…just kidding. They pushed and shoved each other off the library step stool and fought over who had which book first, who “stoled” a book from who, and “who copied whose” idea. After the mayhem, and after explaining numerous times that mommy does not, in fact, SEW… we had two very easy, very different book characters! I then let them choose Max’s…
Q- “Cindy Lou Who” from the book How The Grinch Stole Christmas
Materials:
hot glue (had)
hot glue gun (had)
light pink felt ($)
light pink elastic (had)
pink nightgown (had)
red bows (had)
headband (had)
black pipe cleaners ($)
large red ornament (had)
grinch stuffed animal, for bonus points (had)
scissors (had)
Cost: under $5
This one was easy because Q hardly ever takes off her pink nightgown from Plain Jane. We added some elastic around the legs to give it that bubble-look and I cut a little scalloped collar out of pink felt for around her neck. I then grabbed two red bows from our massive collection and popped some black pipe cleaners onto a headband. Then I found this giant red Christmas ornament in the attic. This costume cost approximately however much a sheet of pink felt and a pack of pipe cleaners costs. Perfection!If she were actually trick-or-treating in this costume, I’d probably buy her some cute pink slippers, like these.
Cub- “Mouse” from the book If You Give a Mouse a Cookie
Materials:
hot glue (had)
hot glue gun (had)
overalls (had)
grey shirt (had)
sneakers (had)
sheet of grey foam ($)
pink felt ($)
grey curtain tie back ($)
sheets of dark and light brown foam($)
scissors (had)
Cost: under $10
Cub really wanted to be an animal and this was was a no brainer because it involves basically overalls and mouse ears! I shopped in her closet for the main part of the outfit and shoes. Then for the ears and the cookie I literally bought sheets of that foam stuff from Hobby Lobby. I cut out two circles from the grey foam for ears and cut out pink centers for the ears from the leftover felt from Q’s collar. I glued the ears right onto a plastic headband. For the tail, I found a grey curtain tie-back at Hobby Lobby and pinned it onto the belt loop on the back of the overalls. For the giant cookie, I used the foam again. A light brown for the cookie and then I cut out sloppy circles for the chocolate chips from a darker brown foam sheet. Voila- we gave the mouse a cookie.
Max- “Max” from the book Where the Wild Things Are
The girls picked this solely because they thought it was cool that the character’s name was Max. This was probably the most difficult of the three costumes to put together, but still pretty easy. I started by cutting out the crown in the yellow foam sheet, measured it to Max’s head so it would be a little bit big and then glued the brown fur trim to the bottom. I then gathered up the white fur trim and safety pinned it to the butt. Then since I had extra brown felt from Cub’s costume, I cut out round buttons and pinned them onto the front of the romper. It would’ve been easier (and much safer) to just glue them onto the romper fabric, but I’m trying to salvage the outfit here. Next I wanted to add some claws to the feet of the romper but again, didn’t want to glue them onto the fabric, so I improvised: I grabbed some old white socks, glued the claws on and slipped the socks right over the footie part of the outfit. Lastly for the whiskers, I just folded the pipe cleaner into the hood and used some fabric tape to keep them in place on the inside. If I were going trick-or-treating or using this as his actual costume for any extended period of time aside from a quick picture for an Instagram challenge, I would’ve cut tiny holes in the hood and glued the whiskers in place. Loose parts on a baby are NEVER a good idea, as they can pose a choking hazzard, so please keep that in mind.
If you flip through some books and your kid’s closets it’s easier than I thought it would be to come up with cute costume ideas. Here are a few other book characters I thought of:
Fern, Charlotte’s Web: overalls, pigtails, converse and a stuffed pig. maybe add a cute spider headband?
Pete the Cate: blue romper, cat ears, maybe pin some big colorful buttons on, and of course, some converse sneaks!
Alice the Fairy: Cute dress, wings, wand, some crazy curly hair!
Disclaimer: I want to start by saying that I am fully aware that there are many people/organizations out there who believe breast milk is and should be the only source of nutrition a child needs/receives until 6-12 months of age. I completely value and respect those opinions. What I’m going to talk about on my little blog here is what has worked best for me and my family, and may not be what works best for you. Always be sure to check with your pediatrician before introducing any new foods and/or routines to your baby.
It’s kinda of surreal to me that it’s time to give Max his first taste of real food. Mostly because I remember sitting both Quinlin and Cubby in the very same high chair, entire extended family gathered around to have their first spoonfuls.
But Max is supposed to be my newborn…like, forever. How can he be eating solids already? I guess a tiny sliver of me is hoping that by introducing some foods, maybe he’ll be up less throughout the night to nurse. Here’s hoping…
When starting Q on baby foods I just did exactly what my pediatrician advised and introduced rice cereal. This immediately caused constipation issues. So with Cub, I did a bit of research and found this amazing site www.wholesomebabyfood.com. It has such great advice and ideas…and I particularly love the little charts you can print out. I printed them all and made a little binder. I’ve added tabs and notes for each kid, so it’s really nice to go back and see which foods I gave to the girls, what type of reaction they had, the dates I introduced new things, etc.
When to Start: My pediatrician told me to start introducing food between 4-6 months. I decided to split the difference and start right around five months. Everyone and every baby is different so, of course, do what works for you and what your doctor recommends! Five months has worked for us in the past and Max seems ready (aka, he tried to swat the pizza slice out of my hand at dinner last night) so we’re going to give it a go!
What to Start With: While pizza may not be the best first food (doctors, phssssh.) I decided for Max, to go the same route I did with Cubby: to skip the cereals and go straight to veggies. I’ve like starting with the veggies first to get my kiddos used to the taste before introducing the yummy sweet fruits. I mean, if someone fed you chocolate cake for a month and then decided to switch you over to strained string beans I think you’d be pretty pissed, too! 😉 Since they are easy, don’t require cooking, and are full of nutrients and fats, I decided to introduce avocados first.
How Much: Again, every baby is going to be different. I think Q hated her first taste of food and hardly ate one spoonful. Cubby, obviously, gobbled hers right up. The very first time you feed, “they” suggest offering just 1/2-1 tablespoon. After they get the hang of the whole eating thing, I usually give the regular dose of breast milk/formula plus 1-3 tablespoons of food 1-2 times a day. Of course, I start slowly and then work up to that amount. I’ve always done breakfast and dinner to start and then added a “lunch” at a later date! Gotta fill that belly before bedtime! 😉
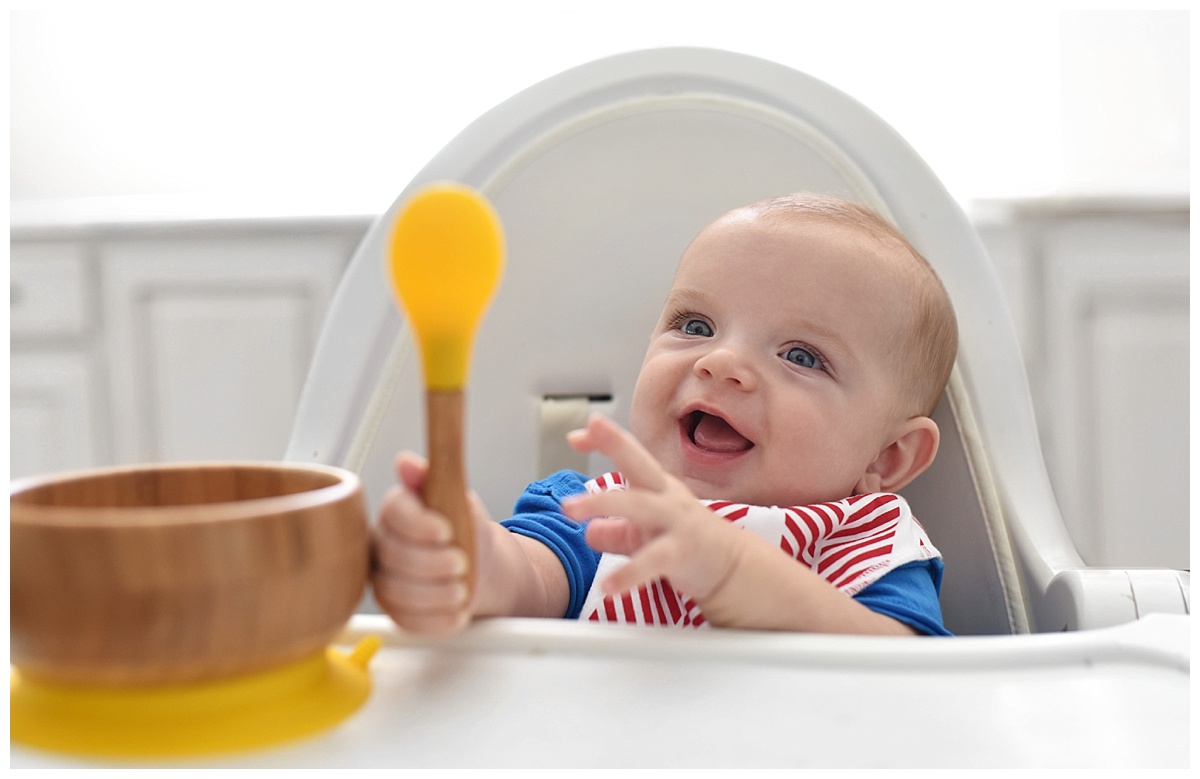
Feeding Tools: I’ve recently been trying to clear out the older, toxin-filled plastics in our house and replace them with wood, glass, and stainless steel for our dishes, cups, and utensils. I’ve partnered up with the fabulous brand Avanchy for Max’s first foray into foods. I love this brand SO much, not only because the materials are safe and non-toxic but because the bowls and plates come with removable plastic suction cups to keep the dishes in place as you feed. Hellooo, less messes! I love that I can suction the bowl onto Max’s highchair tray, but then remove the suction cup when I’m washing or when the girls are using them.
*Don’t forget to enter the giveaway on my Instagram feed. They are giving away an essentials collection to TWO lucky winners!!
“Made from organic bamboo and silicone, they are non-toxic, earth-friendly, BPA, BPS, PVC, Lead, and Phthalate free.” – https://avanchy.com
“Go Time!”: I usually give the first taste of a new food in the morning so that I can watch for any potential allergic reactions during the day (as opposed to at dinner time when they are about to go to bed for the night.) I make sure that I always give my kiddos their regular full milk feeding first (breast milk, or bottle); whatever they normally eat, whenever they normally eat it. I want them to get the full nutrients from the milk before potentially filling up on food. (For example, Max breastfeeds at 11:00 so I made sure to nurse him before we gave him a taste of food!) I chopped the avocado up super small and then mashed it with a fork. It still looked pretty thick so I mixed in some breast milk to make it a little more soupy. The next step is to get a teeny tiny bit on the spoon, introduce it slowly and make sure there is a giant plastic barrier between you and your baby…you never know what might happen!! kidding, kidding. And of course, don’t force it. If baby doesn’t seem interested he/she may not be ready. For us, I tried another small taste at dinner time with the same reaction. I’ll try giving him tiny tastes over the next 3-4 days while I wait to introduce the next food: sweet potatoes. It’s important not to force anything so that you don’t develop any sort of negative association with your baby and food/his highchair, etc.
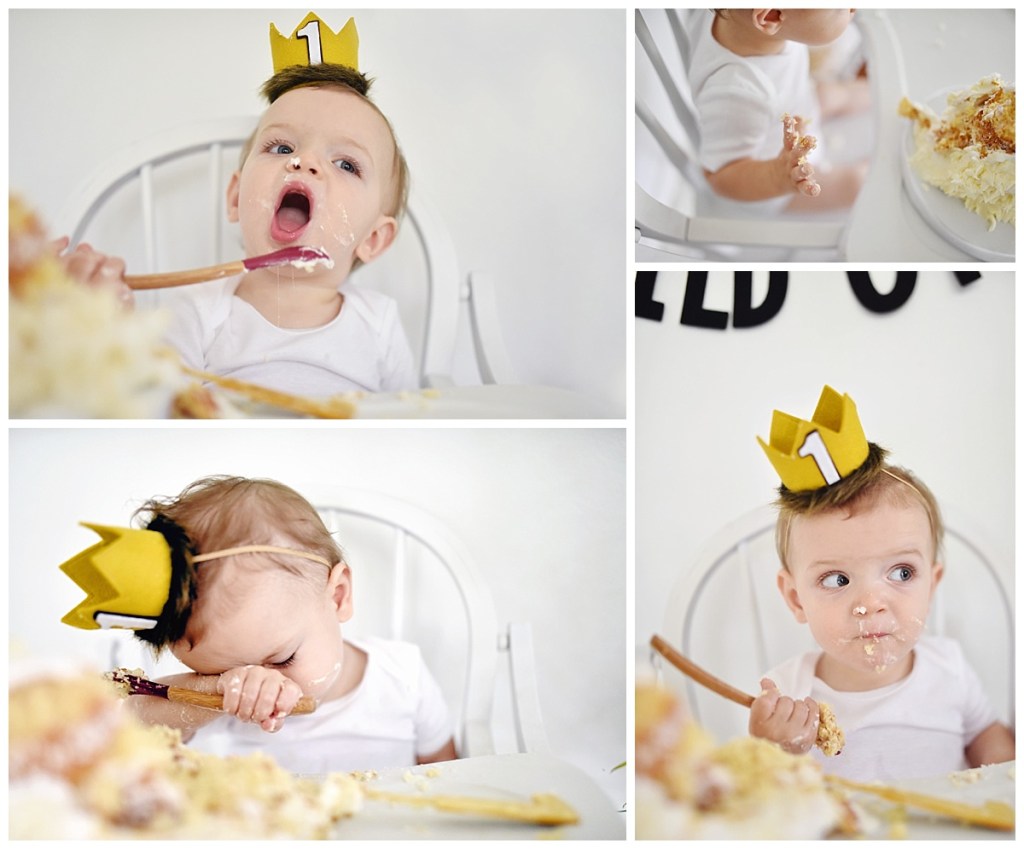
Max’s First Taste: I’m pretty sure the pictures speak for themselves…
Safe to say, he’s not a fan…yet. 😉
Me Being All PC & Stuff: In an effort to present all points of view, here are a few other websites I’ve perused in making my baby-feeding decisions. I don’t necessarily agree with everything on these pages, just thought I’d offer them for those like to read “all sides” before making a decision, like I do. And once more, for good measure: My #1 source of information and advice always comes from my pediatrician and my own mother’s intuition! 😉
While The Wholesome Baby website has all kinds of great info regarding feeding schedules, foods to avoid, allergens, and my favorite: handy printable charts, I want to note- this post is in no way, shape, or form sponsored by The Wholesome Baby. It just happens to be my favorite source that I’ve used for all my children and I wanted to share it with you! While the Avanchy post is sponsored, they are products that I have been using for a while now & sincerely love! I am NOT receiving commission off any purchases made to Avanchy and this blog post contains zero affiliate links. I just like to be honest with y’all! Happy Feeding. xo -J


 One fun idea I (and by “I”, I mean Pinterest) had was for everyone to write a little note to Max in a copy of “Where the Wild Things Are”. I’ll save it along with the birthday cards he received from anyone who couldn’t be here.


 Notice how many baskets I’ve worked into the room? This allows Q to have (hidden) places to put all of her “stuff” (i.e. books, her prayer rock, mp3 player, giant yellow emoji pillow that doesn’t match the room, baby dolls, stuffed animals, pokemon cards, etc.) I think it’s important for kiddos to have places to store items they love- it also. makes clean-up/hiding things much easier & helps keep the room looking put together.
 I tried to take Quin & her interests into consideration as much as possible when picking out decorations. You can find traces of her love of mermaids, her shell collections, her love of dance, music, and reading, and her dream of one day going to Paris scattered around the room. Look closely…I tried to pick items that hold meaning to Q instead of just things I thought were “pretty”. Even something as simple as putting reading sconces over the beds have made her little book-loving heart SO happy!
 Who spotted the monitor camera hidden behind the golden elephant?! Yes, I still spy.
  Lots of people thought that door next to the bed was the door to the hallway, but it is actually Q’s bathroom & closet. I wouldn’t have put the beds on that wall if they were up against the main entrance like that.
 This record player has been one of my favorite purchases for her “big girl room”. Q listens to stories and music before bed and on “sleepover nights” Q & A put on records and dance and act them out (everything is a “show” with these two!) Plus, collecting old vintage records has been SO. MUCH. FUN! Think The Greatest Showman soundtrack will come out on vinyl?!! (Update: it HAS, and I already ordered it!!!) 😉
 I kept certain items from her “baby” room because she’s still only six- even if her room is a little more sophisticated now. Her little pink dollhouse and baskets of stuffed animals remind me that she’s still my baby. I know one day they’ll be replaced with “bigger girl” items. But not today! 😉
 This Petal Lane “being yourself” quote is actually a magnet board! I think it will be fun for Q to tack pictures to it as she gets older. And that DREAM sign stayed from her old room (it actually lights up and serves as a night light) and I just repainted the frame around it to pop against the newly white walls. (They used to be grey).


 This gorgeous fiber art rainbow was the
  Here’s a little TIP for decorating book shelves: If the highest shelf is out of reach for your kiddos try finding books with pretty covers and then ONLY putting the book covers on display on the highest shelf. Tell your kiddos what you’ve done so they don’t go reaching for them. Here’s why I do this: 1.Kids won’t get hurt trying reach for out-of-reach books (aka no heavy books will come crashing down on their heads) and 2. You can put the actual books in a bin somewhere at their level so they can still enjoy the books without them just being “decorations” up high on a shelf, collecting dust.


 We had these gorgeous tutus from
  To put the main cake table together, I contacted my girl Amy from
 The tables and chairs I unfortunately had to rent. I got them from

 Q’s outfit:
 These wands from
 Do you not die over the little girlies picking out their tutus?! I cannot!